Constellation Helmet Build Guide
- josephaguilarsanch

- Sep 1, 2023
- 4 min read

The Constellation Helmet is the first of many Starfield projects to come. I was lucky
For a full write up of all the features you can find them listed on the main product page.
This Build Guide will list the following:
Require materials to complete the project
Assembly videos to walk you through the assembly process
Recommendations for Print Settings/Orientations for certain pieces
Any additional questions you have concerning the building of this helmet can be sent directly to me via the contact page on my website
Build Requirements
or
Visor Requirements
Non-Required Hardware
Up to a 55mm circular speaker (Hobby speakers that can be powered/connected to the Bluetooth Reciever via a 3.5 mm jack)
Bluetooth Reciever w/ headphone jack (Allows helmet to connect to your phone/computer)
LED Diodes (for the overhead flashlight, will require batteries)
Assembly Instructions:
To assemble the Constellation Helmet, watch the video above and take the following steps
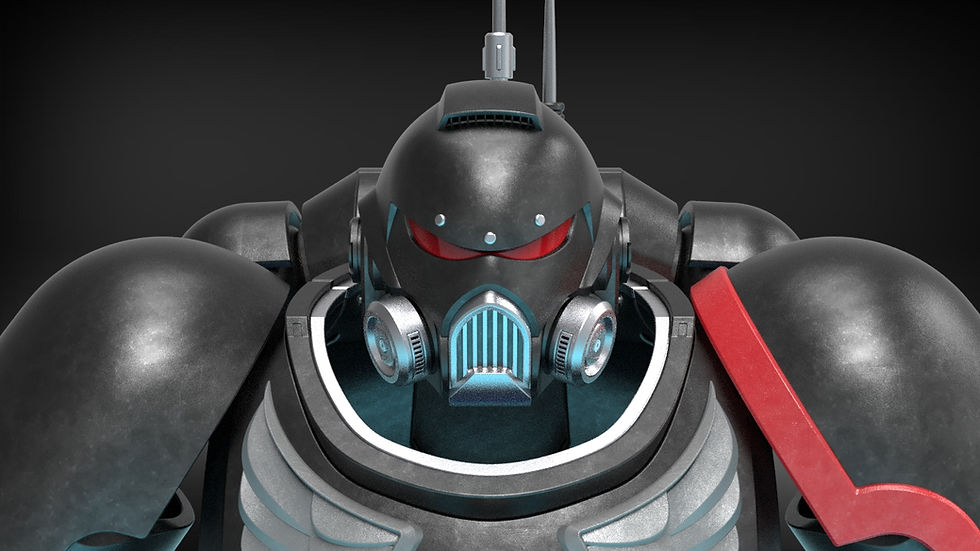
Jaw
- *If printing the files created for smaller printers, first attach the Jaw Left and Jaw Right pieces with an alignment peg*
- Insert the Front Cannister into the Jaw
- Place Front Sensor onto the Jaw
- Insert the Air Intake Mesh Placeholder into the Jaw (the printable model can be used, or it can be used as a circular tempalte for some other mesh material)
- Insert the Air Intake over the top of your Mesh material
- Insert the Speaker Inserts into the Jaws
- If you are using speakers, they can be inserted now, there are channels near the back of the speaker insert to allow wires to pass into the speaker cavity


- Insert the Speaker Cap or Speaker Cap open into the open end of the Speaker Inserts
- The Open Cap can be used if you choose to use speakers.
Main Bucket
- Insert the Main Bucket Handle into the back of the Main Bucket
- Insert the Quarter Panel into the Half Panel, repeat with mirrored pieces for the other half of the helmet
- Insert the Half Panels into the Main Buckets
- The Quarter Panels, Half Panels, and Main Buckets can all be fastened together with the Alignment Keys
- The Wire Inserts can be inserted into the Half Panels, thick wires or hose fittings can be inserted into the helmet and Wire Inserts
- Place the Rear Panel Hose Fittings into the Rear Panel
- Place the Rear Panel Cap into the Rear Panel
- Place the Rear Panel into the Main Bucket, secure with Alignment Keys
- Place Main Bucket Side Button Accents on either side of the Main Bucket
- Place the Temple Antennas in their upper insert slots of the Main Bucket
Total Assembly
- Place four Alignment Pegs into the Main Bucket
- Place the Visor into its lining in the Main Bucket
- Place the Jaw onto the Main Bucket over the Alignment Pegs
- Neck Seal Top and Bottom fit onto each other via alignment pegs. There is a large gap between the two so that you can insert you suit/neck seal material.
Flashlight Attachment
- Insert the Flashlight Mounting Rail into the Main Bucket
- Slide the Flashlight Body onto the rail. It should fit in the small space between the flat end of the rail and the Main Bucket
- Slide the Flashlight Cap onto the Flashlight Body.
- LED Diodes can be attached to the openings on the Flashlight Cap, Flashlight switches and batteries can be placed on/in the flashlight or in the helmet itself

General Printing Tips
There are no specific tips for this helmet as each piece have complex curves and no obvious flat surfaces to print on. This project may be for those with intermediate experience but one easy hack to help print these pieces are to use Cylindric Custom Support downloadable plug-in for the Ultimaker Cura Slicer. It allows you to place custom supports on parts to ensure that you can get much safer and reliable prints on parts with odd geometries.
The very first pieces to print of this helmet should absolutely be the sizing rings. They can be printed flat and only take 2-3 hours for the set. In the long run this will likely save you hours if not days of printing when you can be sure that you will print the helmet at the correct scale the first time around. Keep scaling the rings up or down till you find your ideal fit and then scale the rest of the helmet to that scale. While there is a demo model that can be used for things like armor smith, this will also ensure that the throat of the helmet can fit over your head. The "neck" of the sizing ring assembly is equal in shape and size to the throat of the helmet.
*If you plan on using the Neck Seal, you can also use that as a sizing ring, as it is a fully enclosed circular ring*