Halo: Infinite MK50 Sidekick
- josephaguilarsanch

- Dec 6, 2021
- 4 min read
Updated: Dec 8, 2021
The highest fidelity model of the MK50, worthy of the long awaited return of the Halo series.
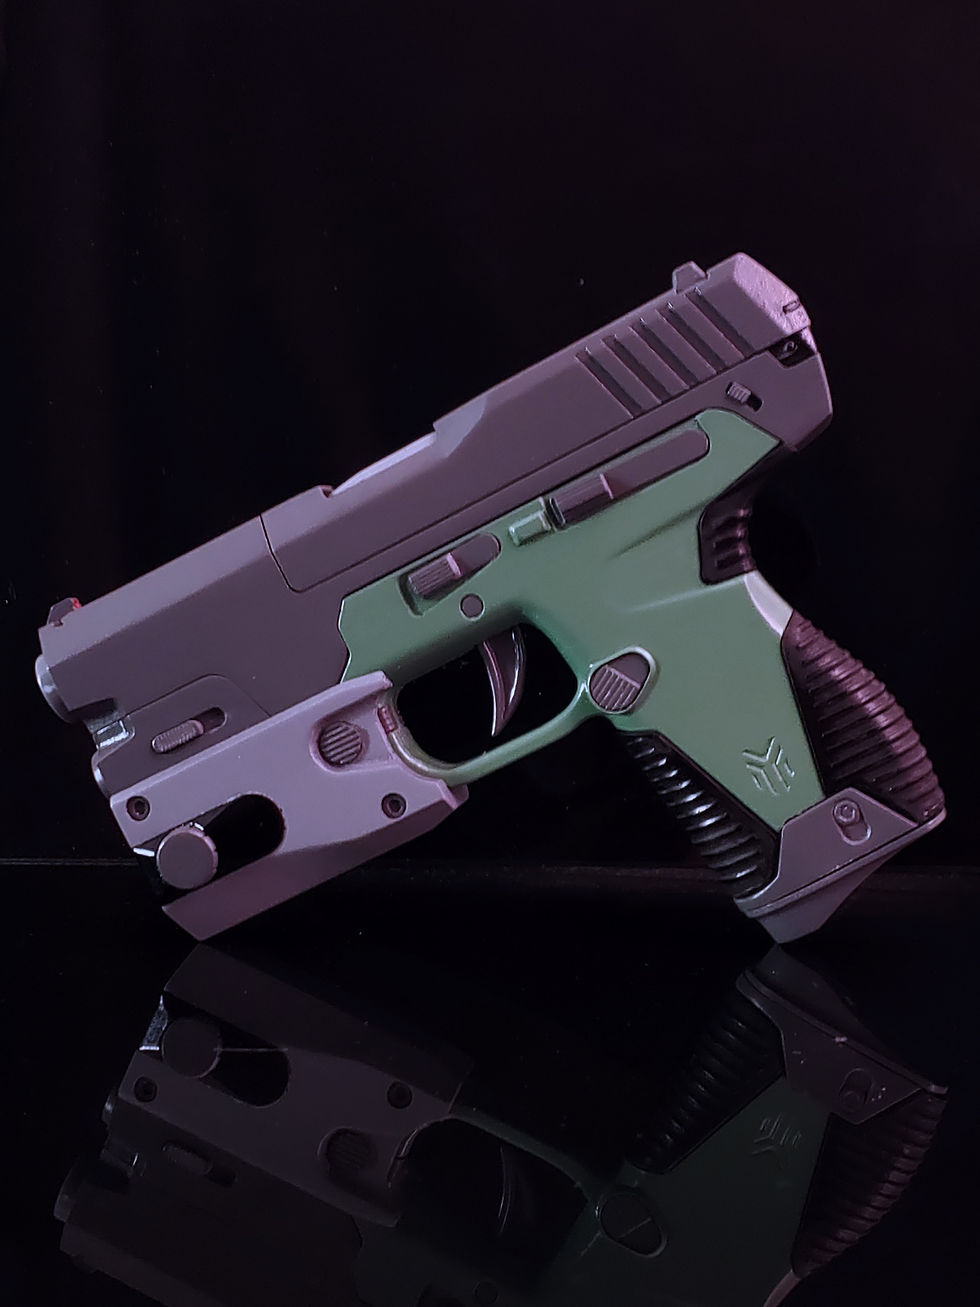
This project presented the challenge of creating a model that was highly detailed, functional and as game accurate as possible while still maintaining the simplicity to be easily printed and assembled. It incorporated techniques that I have developed over 2 years of digital modeling and I couldn't be happier with how it turned out!
*Assembly video in the Builds section below
Major Features


Modular Design


This model is comprised of over 40 unique pieces. Among those pieces are different options for the Top Frame, Grip Body Frame, Slide, Underbarrel Attachment and Flashlight Body Frame. This includes different options for where or not you want to print the body with engravings, as well as whether you want an underbarrel attachment or not.
Apart from the ribbed grips on the pistol body, the bracket at the base of the pistol body, and all the small accent details. All major body components of this pistol can be assembled without the need for glue.
A slide release ensures that the top frame, slide mechanism, and the grip all stays together, while a screw in "flashlight", keeps the underbarrel attachment screwed into the frame and grip.
Functional Spring Operated Slide

The slide is able to be pulled back into a hard stop built into the frame. Then a spring will pull the slide back into its proper place along the barrel mechanism. The slide moves backward until it reveals the cartridge ejection port which shows the inner parts of the pistol including the magazine and into the rifled barrel.

In the picture above, you can see the slide pulled back to reveal the magazine and rifled barrel. You can also see a hook on the back of the barrel mechanism and a hook on the inside of the slide itself, this allows for a rubber band or tension spring to be fastened to the two pieces so that the slide springs back into place. *Important Note*
A short, strong rubber band or a short strong tension spring should be used, recognize that when the barrel and slide are attached to the frame, in order for the slide to sit in the correct spot that should not be too much space in between the hooks in the barrel and slide. Better notes in the builds section below as I end up using a strong tension string and secure in the hooks using rubber urethane.


Here you can see the hardstop and how it allows the slide to move over it until an internal barrier halts the movement in the correct spot.
Rotating Trigger w/ Functional Safety

The trigger freely rotates within the grip and features a small hook at the top with two catches. The bottom most catch is to hold a small rubber band. The other end of the rubber band should be fastened around the hook in the frame of the grip shown in the picture above. This allows the trigger to snap back into place when pulled. The second catch in the hook allows it to be able to snag the safety if the safety is rotated into the downward position.
Removable Magazine w/ working Mag Release Button

The magazine includes five removable bullets. This is enough so that it appears the magazine is full of bullets from any angle.

The magazine cannot be inserted or removed unless the mag release button is pressed in. In the above picture you can see a cylindrical cavity to place a spring between the button and the grip frame. When pressed in, the button/s inner curvature matches the magazine and magazine slides through. When not pressed the button will not align with the magazine and the magazine will stop on the button.
Misc. Features
This model also features a rifled barrel, optional underbarrel railing for misc. attachments, and removable ribbed grips. Below, in the builds section, you can see that I end up casting those grips in urethane rubber.
Builds
During my pro-typing process, I probably ended up with an entire pistols worth of obsolete parts that were updated before they arrived at their final state.
I personally printed the pistol without all the engravings just because I preferred how it looked and didn't want to deal with all those little details when sanding/painting.
One of the biggest issues I had was with the barrel/slide mechanism. After hooking the spring, I recommend pouring in some epoxy, or in my case fast curing urethane, in order to ensure the spring doesn't unhook itself once the pistol is put together. Additionally, ensure the spring is no too long as it wont allow the barrel and slide to close close enough together to fit correctly once assembled.
Additionally, I ended up making some molds of the grips and casting them in urethane rubber to give the pistol a better feel and aesthetic.
I'm sorry to say I didn't get a lot of pictures of the build process so I can only put up the finished product in the video shown above.
What Next?
If you are looking to create you own models like this one feel free to checkout all of my tutorials on 3D modeling and prop making techniques.
If you are looking to purchase the model so that you can print your own you can find it in the store.
Lastly, make sure to check back in every once in a while to see what I've been working on
Thank you for your time