

Palsphere - Build Guide
- josephaguilarsanch
- Jan 31, 2024
- 3 min read
Updated: Feb 20, 2024
You're just one pal sphere from catching that King of the Forest, Mammorest, trust me.

Full File Set Required Available Below for Free!

This Build Guide will list the following:
Require materials to complete the project
Assembly videos to walk you through the assembly process
Recommendations for Print Settings/Orientations for certain pieces
Any additional questions you have concerning the building of this model can be sent directly to me via the contact page on my website
Build Requirements
A standard 3D printer such as an Ender 3. Most printers should be able to print this prop without custom slicing
1-2 Rolls of PLA (I prefer SUNLU) (Does not require much filament, but may require two rolls if you desire two different colors for the filagree and Sphere Body)
Non-Required Materials
These materials are only required if you want to create the resin version of the sphere halves
Assembly Instructions:

This tutorial is broken into 2 separate parts
Standard Pal Sphere Assembly
- This will showcase how to assemble the standard Pal Sphere
Resin Pal Sphere Assembly
- This will showcase how to utilize the included STLs to help with making resin sphere halves
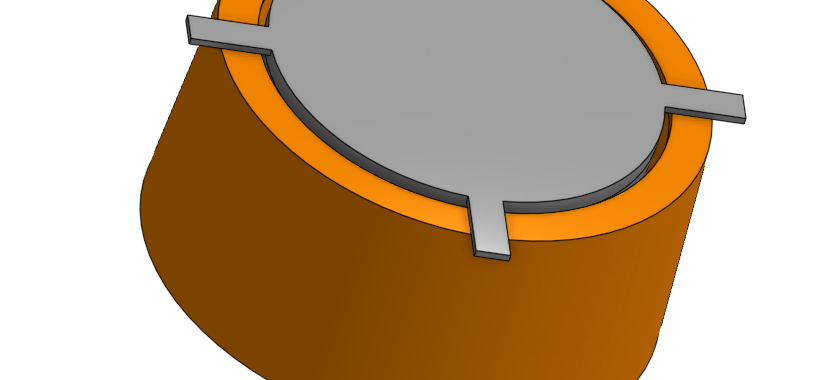
Sphere Assembly
The video below contains written text to illustrate how to put together the base helmet bucket.
Place the Filagree over the top of your sphere half. It will need to be secured with glue/adhesive. Make sure that the bottom of the filagree is flush with the bottom of the sphere half it is connected to such that the seal is nice and closed when the two halves connect.
Place the Topper Insert on top of the Sphere half and insert the Topper
Screw the Topper Screw into the Topper through the inside of the sphere. This will secure the Topper and Topper Insert to the top of the Sphere. The Topper Screw has four holes in the head to allow for some needle nose pliers to be used to turn the screw, but can be easily hand turned.
Connect the two halves and you are finished!
Resin Mold Tools
There are a number of tools included to help one make resin casts of the sphere halves if desired.


For Each Sphere half there is a seperate version fo the Mold Plug and the Mold Negative. Both can use the same Mold Shell. Place the Plug in the Shell and pour in your molding agent.
Once your molding agent cures, you should end up with a bowl shaped rubber mold Place the Mold Negative with this sphereical cavity, ensuring the plug enters the hole at the bottom of the mold. This will create the hollow spherical cavity needed for your resin sphere. Pour your resin in! Each half is about 100 ml, so add a little buffer in there. Perhaps mix 120 ml of resin per sphere half. **Remember to degas the resin as best you can prior to pouring it into the mold, Additionally, sanding/smoothing the Mold Negative and the Plug may make your life easier when it comes to having to then sand and polish the resin cast to make it clear/shiny
General Printing Tips
I have a few printing tips to give on certain pieces to ensure that you get the best print quality. These are just recommendation and are by no means the only way that these parts can be printed.
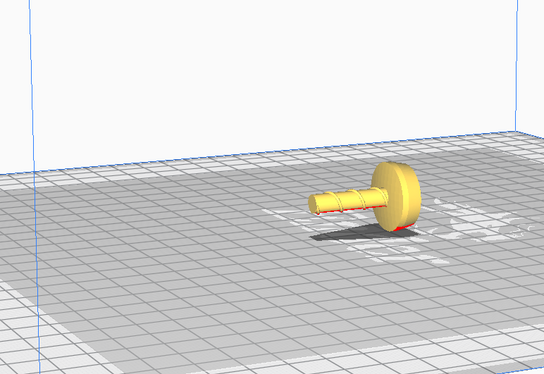
Load Bearing Pegs/Screws/Rods
The Topper Screw should be printed as shown, this will ensure the layers aligned with their longitudinal axis and prevent Pegs shearing apart in the helmet.
Additional tolerances were applied to this model so you dont have to worry about the rough support surface preventing the screw from screwing into the Topper


General Piece Orientation
All of the semi-spherical pieces can be printed on their flat face

For the Filagree piece with included support, you should end up with that support "shell" being one wall thick. This was intended for printers with .4 mm nozzles. This will make this wall easy to remove later.

Below is video showcasing how to remove this support skin. I "scored" the edges with some pliers and then peeled it away from the actual filagree. Afterwards I sanded the edges with a dremel and some sandpaper.
The Topper insert is a little tricky as there is no clear flat face. To ensure all the smoothest faces are outward facing, you can print flat as shown below. In order to ensure you dont lose to much detail on the bottom points, you can use custom support plug-ins such as Ultimaker Cura's "Custom Cylindrical Supports"

The topper can be printed flat on its bottom face with no supports
