

Raksasha Armor Core Build Guide
- josephaguilarsanch
- Jan 26, 2023
- 11 min read
Updated: Jul 4, 2023

The Rakshasa Armor core is one of the most comfortable and unique armor cores available, and this build guide, I will show you not only how to make a comfortable, but accurate rigging system necessary to securely attach the armor to your body.
For a full write up of all the features you can find them listed on the main product page.
This Build Guide will list the following:
Require materials to complete the project
Assembly videos to walk you through the assembly process
Recommendations for Print Settings/Orientations for certain pieces
Any additional questions you have concerning the building of this rifle can be sent directly to me via the contact page on my website
Build Requirements
1 roll of 2" nylon straps (you will need an additional set of 2" buckles)
Assembly Instructions:
Below I will break up the assembly process into 3 main sections, the Torso, Arms and Legs. Each section will come with accompanying pictures and written/video tutorials for how I personally rigged my Rakshasa armor.
Torso

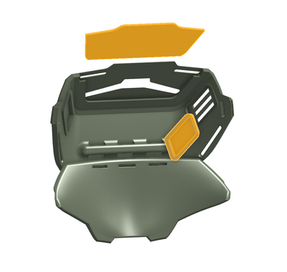
The Torso Assembly is comprised of four major components: the chest plate, the cod piece, the back harness, and the lumbar/tailbone plate.
Chest Plate:


The chest plate is comprised of two major components: The breast plate and the abdominal plate. Both of which are two singular large pieces that are attached via 3 hidden channels that can be secured via straps, zip ties, etc. This makes for secure but flexible connection that is held tight to the torso by the 4 external strap channels that lead to the back harness.
Below is a video that shows how I rigged the entire chest assembly for use in my own armor.
The torso features an internal plate that comes with two options. A clean plate and a plate that features attachment points for future armor customizations that I will be modeling in the future. Additional attachment points show up on the sides that have a dedicated internal plate cover when not in use. All these attachment points are meant to allow for bolts, zip ties, or straps to pass through to attach additional hard/soft elements such as UA attachments or pouches/equipment.


Lastly, hanging off the front of the breastplate are two functional buckle assemblies with a removable buckle insert. Pressing on the bottom of the assembly, releases the buckle insert.


For those who want a simpler build process, there is a clean breast plate that removes the internal plate feature and comes a singular easy-to-print plate. There is also a solid buckle assembly that attaches to the armor.


Harness:

The back harness features 4 external strap attachment points for the chest plate to attach to.

Cod Piece:


The codpiece is comprised of a longer central plate with two flexible wings on either side. The wings are attached by a functional print-in-place hinge. There are locking pegs to attach the wings and central plate into a secure, flexible assembly. All pieces features loops for the wings and central groin plate in order to secure the entire cod piece to the lower harness rigging.

Lumbar/Tail Plate:
The lumbar plate has a large internal cavity where the entire lower harness can be housed. There is a large channel to pass the main belt of the Rakshasa armor core. The tail plate is separate and can be attached via additional strap support.

Arms

The arm assembly is comprised of the shoulder plate mounting system, the forearm plate and the hand armor plates.
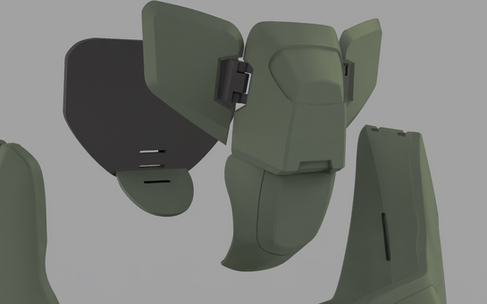
Shoulder Plate Mounting System:

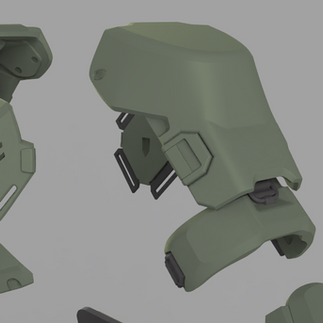


The shoulder plate mounting system features a mechanical locking system to allow for fully customizable shoulder plates. I will eventually release a full customization set with every available Rakshasa armor customization and they will be compatible with this shoulder system.
The below video shows how the shoulders can be easily replaced in the field.
Additionally, the mounting base for the shoulder plates features 3 internal channels: two to attach to the arms and a vertical strap to help keep the entire assembly up on the arm. In my personal experience the two arm straps are more than enough to keep the shoulders in place when utilizing grippy elastic bands and Velcro.


Forearm Plate and Hand Plates:


The Forearm plate is comprised of one main plate, and a small wrist cuff that locks into place. The fore arm plate is meant to be held in place by a large elastic strap as it appears in-game.
The hand plates are comprised of one main hand plate and 5 different knuckle guards. The knuckle guards will need to be glued to your gloves but the main hand guard has strap loops to be able to sew/attach the hand guard to the gloves of your choice.
The below video shows how the forearm assembly fits together and how the straps are incorporated. Additionally I show how I utilize the handguard.
Legs

The Leg assembly is comprised of the thigh armor, calf armor, kneepads and armored boots.
Thigh Armor:


The thigh armor is comprised of one large singular shell with one small lower strap arm in the rear glute. The lower strap arm connects to the main shell via paracord on one end and connects to the front of the thigh shell via an elastic strap channel that makes a flexible band that hugs the lower thigh. Alongside that, there is a large channel in the main body of the thigh through which a strap can be passed through for an additional thigh connection or to connect the thigh to the lower harness to help keep the thigh shell up. Lastly, there is a small front channel to allow for the cosmetic strap shown in-game.
Calf Armor:

The Calf armor plate is a singular piece that slips over the foot and sits snugly around the calf. A lower strap channel allows the entire shell to be secured to the leg similar to a shin-guard for sports. Lastly there is a rear strap channel that allows for the accent strap that appears in-game.
Knee Pads:

The knee pad is a simple plate with an internal strap channel large enough for two separate straps in order to make a firm connection about the knee.
Armored Boots:

There are two major options for the armored boot: a fully enclosed boots including soles/treads, and a slip-on version of the booth that can be strapped onto some comfortable boots of your choice. Both versions attach to the boot/foot using a series of strap channels. The top of the boot attaches to the heel via an elastic band to fasten both around the boot. The armored toe has a series of forward channels and side channels to tighten it around the toe of the boot and pulled tight against the back of the boot. Lastly, both boots feature toe spikes that attach via a freely rotating rod that has a limited range of motion to allow the toe spikes to rotate upward but not downward.


Lastly, the fully enclosed boot comes with molds that will create hard rubber versions of the soles to protect the rest of the 3d printed boot from the ground.
General Printing Tips
This armor is scaled to a 5’10” frame. Before you begin any custom scaling to better fit your build, you should uniformly scale all the pieces to your height. A number of the assemblies come with sizing/scaling tools to further help you estimate how each piece will fit your body.
This armor will require at least a 300x300mm build plate and a 400-450mm build height to print without custom slicing. If you require custom slicing, contact me and I will do it free of charge.
Any piece of armor that has an internal channel for a strap should be printable without internal supports. Internal supports may prove difficult to remove so you should ensure that you either have custom support blockers or have adjusted your support settings to ensure there are no supports inside strap channels.
Arms>Forearms
These files are pretty straight forward, you can use the Forearm Test Plate and the Wrist Guard to test whether the forearm will correctly close around your wrist. Once you get the scale you desire, the Wrist Guard will be reusable in the full plate and you’ll just have to print the full forearm plate to finish the set.
For the Wrist guard, since there is no obvious flat surface, you can just lay it flat and try adding some custom supports at the base using plug-ins such as Ultimaker Cura’s Cylindrical Custom Support plug-in, which I used through out the printing process
Watching my Forearm/hand assembly video should hopefully make it clear how the wrist cuff attaches to the armor and how I did the forearm rigging to match the in-game set up as closely as possible
The Forearm assembly and the Shoulder assembly come with “Full assembly” STLs for highly customizable scaling. See the Arms>Shoulders section below for a full description of how those should be used.
Arms>Hands
Use the dimensions listed in your slicer to estimate how large the hand guard/knuckles will be relative to your glove.
I printed the hand guard vertically with some custom cylindrical supports at the base for stability
Arms> Shoulders
The shoulder folder contains a legacy folder for the original orientation for those looking to load the files in the same orientation and position as the promotional photos. Otherwise the shoulder files have been reoriented for ease of printing
The shoulder assembly comes with a custom scaling ring that can be used to determine how well it will fit around the arm. If you find that you want to just scale the thickness or the width of one either the shoulder assembly or the forearm assembly, you may run into some issues. Here is a detailed guide of how to get a perfectly custom scaling.
The Shoulder Assembly consists of several parts that all need to be scaled the exact same. To ensure this is done you can use the Full Shoulder Assembly STL. Once it is loaded it will appear like this. Scale the entire assembly as you desire.


Once this is done we know that each piece has the custom scaling applied and will fit with each other piece. From here we just need to separate each piece in the mesh so that it can be printed separately.

This can be done with Ultimaker Cura’s Mesh Tools Plug-in, which can be found for free in the Cura Marketplace.
This plug in will allow us to select the STL and split by parts

Once this is done, you can now select individual parts, delete the rest and reorient the part to be ideal for printing.


When printing the Locking Pin or Attachment Adapter STL, make sure the layers align with the long axis. What this basically means, is that they should be printed on their “side”, with a high infill as they will be what comprises the mechanical mechanism by which the shoulder is locked into place
Make sure to watch the Shoulder Assembly video to see how shoulder plates are placed onto the shoulder base and how all the straps are incorporated into the armor.
Here is a photo of how the locking mechanism works. This should clear up how everything is held place

Legs>Boots
There are two versions of the boot, a fully enclosed boot, and a slip-on version. The Fully enclosed includes molds to make rubber soles and can fit around a normal shoe, but may look quite large. I experimented with using EVA foam to make a small internal “shoe” to fit inside the boot but it was not as comfortable as wearing an actual boot. The slip-on version of the armored boot, allows you to wear regular boots and attach the armor plating around it with elastic and straps.
See the Boot Rigging Video for more info on how that is done.
Both versions come with their own sizing tools that can be used to know whether or not the armor will fit around your footwear of choice. Remember that for slip-on boots, the armored toe needs to fit over top of the boot but not be long enough to touch the ground. You only want you boot to touch the ground, not the 3d printed parts
For the slip on boots, you may find that the armored toe may have to be scaled in the z axis quite a bit, I personally had to scale it by 65% in the z axis. This is so the toe does not hit the ground once attached to the boot. Because of this I recommend printing the piece vertically.

That large flat pieces in the back of the toe spike housing should be aligned with the build plate. This allows for no supports to appear internally or in the strap channels. This will ensure straps will more easily fit through their channel and there are no rough support surfaces inside the toe that can scratch your boots during the prototyping process.
Legs>Knees
Using the dimensions in your slicer, you should be able to estimate whether or not the knees will fit you. As mentioned above, make sure there are no supports on the internal channels, and you can use cylindrical custom supports to make sure the knee prints well, vertically.
Legs>Shins
The shin guards come with a sizing tool to help you fit the shin guards around the calf. Make sure to watch the video to learn how to put on the shin guards since it is a singular hard-shell piece.
I like to print this piece upside down with custom cylindrical supports as shown

Legs>Thighs
The Thigh armor comes with a sizing ring to let you know whether or not the thighs will fit around the leg. The thigh does not enclose much of the leg so it should be a pretty easy fit.
Make sure to watch the Thigh Rigging video as it shows how it should be set up in order to connect to the lower harness/belt. You may also need some paracord/string for the Strap Arm.
Ensure that the Thighs have no internal supports in the 2 inch strap channel! They are required to print successfully and can be a major headache to remove
Torso>Back Harness
These pieces are fairly straight forward, but one thing to consider is how the Buckle pieces are printed. These pieces will be strongest if printed flat as the buckles will be flexed by the pulling of the chest straps. Printing vertically will give the best resolution to some of the angled surfaces but may cause the buckles to strap when being pulled tight by the chest plate straps. However you decided to print the buckles, a higher infill will help here.
The harness will need to be glued together when testing the rigging, I used hot glue for a semi-permanent hold for testing that I will later remove so I can paint the buckles separate from the harness body.
Torso>Chest.
The main Breast Plate comes with a sizing tool to help fit it around the chest. I personally had to scale the whole chest assembly to about 115% to fit comfortably, so this sizing tool is a must-print. In the end it will likely save you days of printing.
The breast plate should be aligned with the build plate such that the following surface is flush to the build plate

Once that is done, add custom supports to support the bottom of the breast plate. Printing the breast plate vertically like this will kep the front of the plate smooth and accurate while not requiring any supports on the internal plate insert

Torso>Chest>Front Buckles
I recommend printing the Buckle Cover Vertically, the Buckle Insert flat, and the Buckle Rail on its side. Ensure that the layer lines run along the long axis of the Buckle Rail so that when it bends to release the insert, there is no risk of it separating two layers and snapping. This can happen if its printed vertically.
Watch the Latch Assembly video in order to get a better idea of how it works
Torso>Lower Harness
Custom Cylindrical supports will be necessary for a majority of the groin pieces.
The Butt Plate front can be printed vertically to save on print time without risking any rough surface issues on the front of the plate if it is oriented as below.

The Groin Plate Wing Hinge, is a print-in-place hinge that consists of two intertwined hinge joints. Do not separate them when printing. After printing, once the supports are removed, the hinge will freely rotate.
You will likely need a little drop of hot glue in order to keep the hinge pegs in place.
Make sure to watch the Lower Harness Assembly video and email me any questions you have about how to set up the lower harness rigging. This is the most complicated harness in the set but can make for a very secure and comfortable set of armor if done correctly.
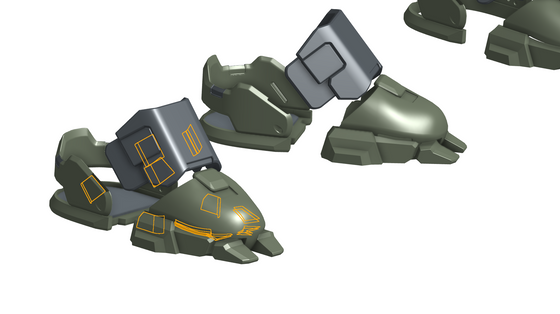
Finished Builds:

Apologies to my ODST set, but this has quickly become my new favorite armor set due to how easy it is to put on and how comfortable it is to wear. The armor looks and feels great and with endless customization possibilities it is bound to have loads of personality. I'm sure as I see other people's builds, no two builds will be exactly the same Next I will be painting the entire suit to give it some much needed personality.